Open Audacity, then use ‘File > Import > Audio…’ in the toolbar repeatedly to import each of your recordings. They should be stacked on top of each other on separate tracks (these are the horizontal blocks running along the screen).
Listening Back
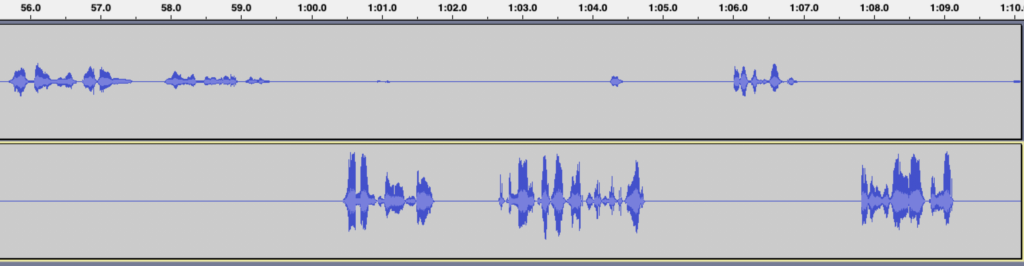
Use the ‘Play / Stop’ buttons to listen to the two tracks together.
If, when you did your interview, you and your interviewee managed to press ‘Start recording’ at exactly the same time, then what you’ll hear is a perfectly aligned conversation, just as your recorded it. But because your interview was recorded over the internet, it’s very likely that there will have been a bit of a time delay – or one of you might have reacted quicker than the other. This means that the two parts of the interview will probably be a bit misaligned. The next step will tell you how to fix that.
Aligning the two halves of the interview
Go to ‘Time Shift Mode’, and then drag the tracks slightly until they are aligned correctly, that is when it sounds like a normal conversation without too much overlapping speech. This a process of trial and error, and you will have to repeatedly move the tracks a little bit, then listen back and see if you’ve got it right, and then try again.
Audacity won’t let you use some functions when you’re in ‘Pause Mode’. If something isn’t working, you might just need to hit ‘Stop’ and try again.
You’re going to need to make some very small adjustments, and zooming in can help make this easier.
Use ‘Selection Mode’ to highlight the area you want to zoom in on, and then click on the ‘zoom in’ icon to get closer to that section. When you’re ready to zoom out again, use the zoom out icon to do so.
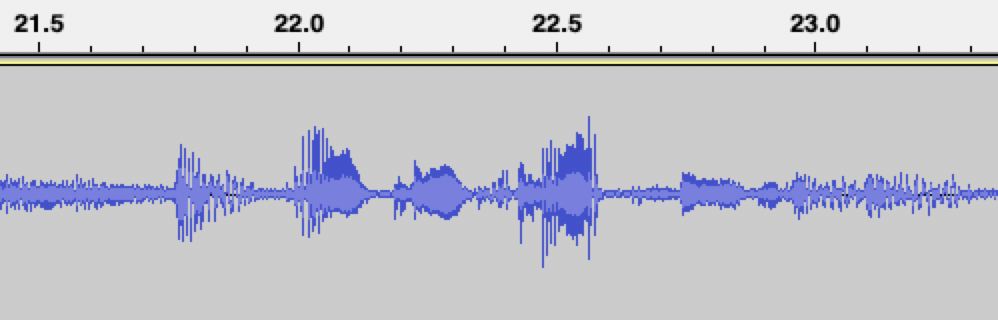
You’ll mostly need to let your ears guide you, but you can also look at the waveform. In places where the waveform is thick and spiky, there is noise going on in the recording.
In places where it’s thin and flat, there’s no noise.
So most of the time, your interview should be lined up so that when one track is spiky, the other track is flat, and vice versa.
This shows that when one person is speaking, the other is being quiet and listening.u003cbru003eu003cbru003eYou can use this idea as a rough guide, but remember that in a natural conversation, people do sometimes talk at the same time! Also, background noise can make a track look spiky when the person being recorded isn’t speaking.
Adjusting Levels
Is one of your recordings much quieter than the others? Try to get all recordings to roughly the same volume.
The easiest way to adjust the volume is using the top of the two bars in the panel to the left of the track. Just drag the blue dot left for less volume, right for more.
Removing sections
Once your tracks are aligned, you might need to remove a little bit from the beginning so that both tracks start in the same place. You might also need to remove a little bit from the end so that both tracks end in the same place.
First, turn on ‘Sync Lock’ by using ‘Tracks > Sync Lock’ in the toolbar. Then go into Selection Mode and highlight the area you want to remove, and use ‘Edit > Delete’ (or the ‘Delete’ key on your keyboard) to cut it out. If your edit doesn’t sound right, you can use ‘Edit > Undo delete’ to try again. You might also need to use the zoom function to make sure you’re cutting in exactly the right place.
Note: ‘Sync Lock’ means that when you remove or add a section, it won’t change the alignment of your tracks, causing them to overlap or leaving big gaps in your episode. But always remember to turn Sync Lock off when you are finished adding or removing bits – otherwise you might find that it interferes with other things you are trying to do.
Listen back to the whole thing
Listen back to the whole thing and check that it sounds OK. If not, you might need to repeat some of the above steps.
Mixing the tracks
Once you’re happy with your interview, mix the two halves together into one. In Selection Mode, highlight both tracks together and then use ‘Tracks > Mix > Mix and render’.
Exporting your work
Use ‘File > Export > Export as WAV’ to export your interview as an audio file. Give it a name that makes sense, and save it in a safe place.
You can now start using the Level 1 ‘How to edit’ instructions, treating your Zencastr interview just like your other recordings and importing it along with the rest.