If you recorded any of your interviews online – using either Zencastr or Voice Record Pro – you’ll need to start by syncing up the two halves of your interview before putting it together with your other recordings. Click on the button below for instructions on how to do this. (You won’t need to do this if you wrote down a list of questions and asked your interviewee to record themself answering these.)
If you recorded anything in more than one language, you’ll need to join your English-language translation with your non-English-language recording before putting it together with your other recordings. Click on the button below for instructions on how to do this.
Open Audacity, then use ‘File > Import > Audio…’ in the toolbar repeatedly to import all of your recordings. They should be stacked on top of each other on separate tracks (these are the horizontal blocks running along the screen). You can name each track with e.g. ‘interview with Sally Wilson’, to stop you from getting confused while editing. Just click on the track’s default name and select ‘name…’ to rename it. Does your audio appear in stereo or mono? If it’s in stereo, it will look like the track has two parts, and if it’s in mono it will look like it has one part. If it’s in stereo, mix it down to mono using ‘Tracks > Mix > Mix stereo down to mono’. Do this for every recording. If you have lots of tracks, you can fit them all on your screen by clicking on and dragging the lines between the tracks.
Aligning your recordings
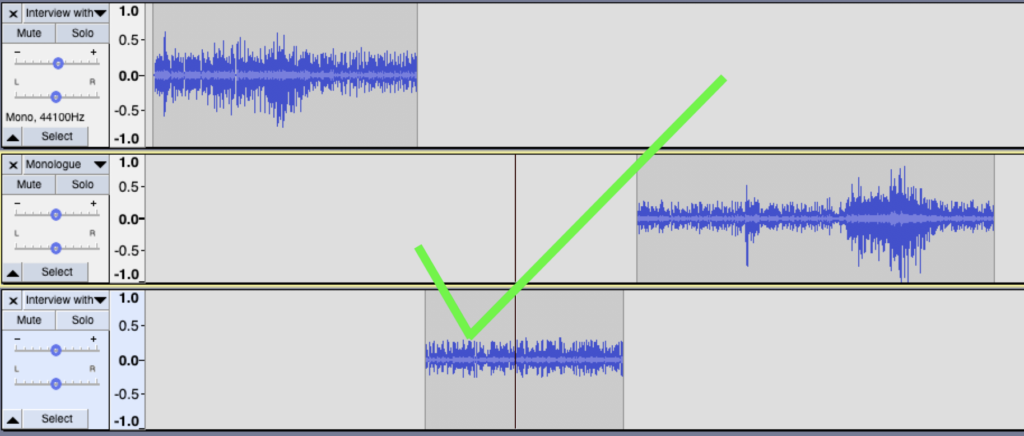
Go into ‘Time Shift Mode’ It might be useful to zoom out so that your recordings all fit on your screen at once. Do this by clicking on the ‘zoom out’ icon, which looks like a magnifying glass with a minus symbol on it. Drag your recordings so that they no longer overlap: they should appear one after another from left to right of the screen. Create a little gap at the beginning, and a little gap between each recording. At this stage, you can choose what order you’d like your recordings to appear in. Changing the order can really change the story you’re telling! Think about how you want to introduce your listener to the topic, what you want them to hear next, and what you want your conclusion to be.
Make sure to check that your recordings aren’t overlapping. They should look something like this (one after the other):
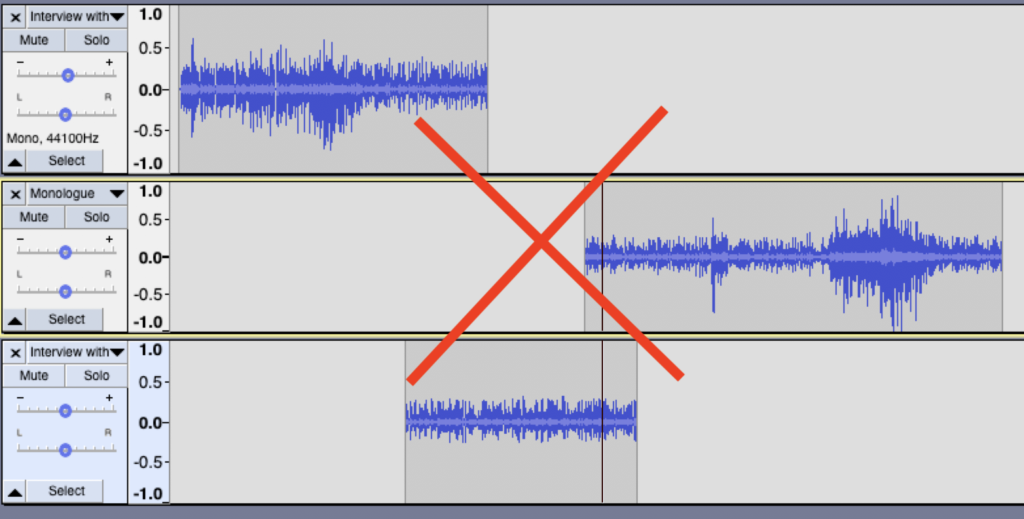
…not like this (overlapping):
Listening Back
Use the ‘Play / Stop’ buttons to listen to back. You can move your cursor to a different recording, or a different part of a recording, by going into ‘Selection Mode’ (see the video below) and clicking on the part of the track you want to go to.
Use the ‘Play / Stop’ buttons to listen to back. You can move your cursor to a different section by going into ‘Selection Mode’ and clicking on the part of the track you want to go to.
Audacity won’t let you use some functions when the you’re in ‘Pause Mode’. If something isn’t working, you might just need to hit ‘Stop’ and try again.
Adjusting levels
Is one of your recordings much quieter than the others? Try to get all recordings to roughly the same volume. The easiest way to do this is use the top of the two bars in the panel to the left of the track. Just drag the blue dot left for less volume, right for more.
Removing Bits
This is the trickiest step at Level 1! Were you interrupted during any of your interviews? Do you want to edit down a longer interview to just the best part? Is there some silence or background noise before or after an interview that you want to remove? Remember that you are editing your recordings into an episode which should be less than 20 minutes long in total – so you’ll probably need to remove some content. Choosing what to take out and what to leave in can be tricky, but it’s a very useful skill to develop, and as you develop it, you’ll learn to be creative with the editing choices you make, leaving in just the highlights so that your listener stays interested and engaged the whole way through.
First, turn on ‘Sync Lock’ by using ‘Tracks u003e Sync Lock’ in the toolbar. Then go into Selection Mode and highlight the area you want to remove. Use ‘Edit u003e Delete’ (or the ‘Delete’ key on your keyboard) to cut it out. If your edit doesn’t sound right, you can use ‘Edit > Undo delete’ to try again.
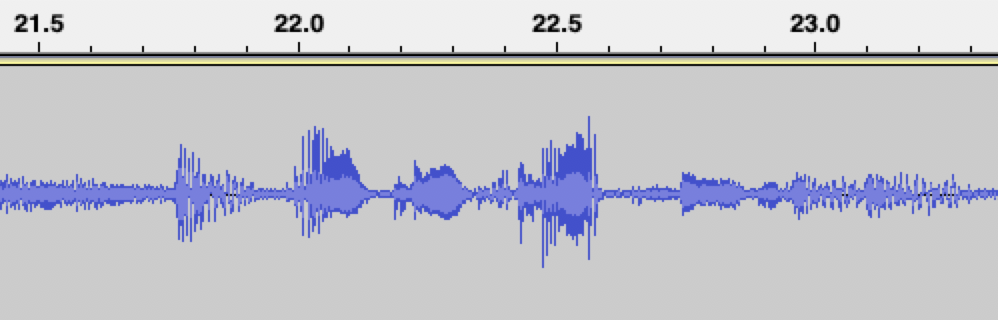
Working out where to make the cut can be tricky to do, because you don’t want the listener to be aware that something is missing. The cut has to be made at a point where no one is talking, and there are no big noises going on in the background. You can listen for the right place to make the cut, but you can also look at the waveform. In places where the waveform is thick and spiky, there is noise going on in the recording:
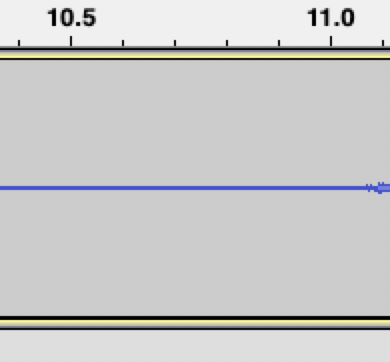
In places where it’s thin and flat, there’s no noise:
When you want to be quite precise about where you’re making your cut, zooming in will help to make your job easier. Use ‘Selection Mode’ to highlight the area you want to zoom into, and then click on the ‘zoom in’ icon to get closer to that section. Always remember to listen back and see how your edit sounds! Remember that you can always use ‘edit / undo’ to try again – in fact you’ll almost certainly need a few attempts to get it right. When you’re ready to zoom out again, use the zoom out icon to do so.
‘Sync Lock’ means that when you remove or add a section, it won’t change the alignment of your tracks, causing them to overlap or leaving big gaps in your episode. But always remember to turn Sync Lock off when you are finished adding or removing bits – otherwise you might find that it interferes with other things you are trying to do.
Fades
Doing a tiny, tiny fade in and out of each section will make the audio sound smoother. Highlight the section you want to fade, and use ‘Effect > Fade In / Out’ in the toolbar. If you’re fading in or out of an interview or monologue, fade before the person has started speaking or after they have finished.
If you highlight a longer section, you’ll get a longer, more audible fade-out that the listener will notice.
Adjusting the time between sections
In ‘Time Shift Mode’, adjust the time between sections so that each gap is about one second long. Use the timings above the tracks to help you.
Listen back to the whole thing
Always listen back to the whole thing at the end. Check that none of your recordings are overlapping, and that there aren’t any big gaps between your recordings. Check that you haven’t removed anything extra by mistake.
Saving your work
While you’re working in Audacity, make sure to regularly save your Audacity Project File.
Select ‘File > Save project > Save project as…’. You will get a warning notification. Don’t worry, we’ll tell you how to ‘Export’ your episode as an audio file at the end. For now, just click ‘OK’. Name your file and save it in a safe place.